I’m moving to a new apartment and I have more space for the voltlog lab. Unfortunately I won’t be able to upload any videos for 1-2 weeks until I have everything setup.
Category: DIY
This category will hold everything DIY related.
Voltlog #99 – Samsung TV Power Supply Board Repair MK32P5T BN44-00213A
In this video I am repairing a power supply board from a Samsung TV. The part number for the power supply board is MK32P5T (BN44-00213A). The TV was showing the stand-by led but refused to turn on. It turns out this was a common problem with a simple fix.
Here are links to some of the tools used in this video:
Voltlog #96 – How I Made The Raspberry Pi 4
This is a behind the scenes video on how I designed and assembled the raspberry pi 4 board.
Voltlog #93 – Bluetooth Receiver Weekend Update
This week I build a DIY bluetooth 4.0 audio receiver. I used the CSR8635 bluetooth module, a recycled lithium battery cell that I got out of an old laptop, a TP4056 battery charging & protection IC and a DIY PCB I made myself.
Here are links to these items if you plan to build one yourself:
- CSR8635 Bluetooth 4.0 Stereo Module
- TP4056 Battery Charging and Protection Module
- 400mAh Lithium Polymer Battery
- MCP6272 op-amp
- 3.5mm Stereo Jack
- Generic ABS Plastic Enclosure
Or you can just buy a ready-made bluetooth receiver.
Voltlog #87 – Assembling The T12 Soldering Station Kit
Voltlog #86 – Limiting Iphone USB Charging To 500mA
It all started a few days ago when I was talking with a friend and he suggested, since we do most of our phone charging at night, why not charge them at a lower rate for increase battery life. As you may know, when you increase the charging current, charging happens faster at the expense of losing battery life over time, you get fewer battery cycles before it starts losing its capacity.
So I decided to build this small gadget, that goes between the usb output of my charger and the usb plug from my charging cable. In my case I have an Iphone and the charging current can be limited to 500mA by having a set of resistors on the USB data lines.
Links for the parts used to build the project:
Voltlog #82 – DIY Adjustable Analog DC Electronic Load
In this episode I am building an analog adjustable dc load with parts easily obtainable from ebay and banggood. The advantage of such a dc load is that you can understand how it works, modify or repair it if necessary far easier than you would with a digital one. I was able to push mine up to 60W dissipation, but it is recommend to stay under 50W to protect the mosfet.
Here is a list with links to the parts used in this project:
- Constant Current Analog DC Load PCB Module XHDZ-FZ-2D
- PZEM-031 100V 20A LCD Panel Meter
- Metal Enclosure 170mm x 130mm x 75mm Blue
- 10 Turn 10K Potentiometer
- Brass Standoffs Kit
- M3 Screw Kit
- KSD9700 NO Thermal Switch
- Cooling Fan 12V
- JST XH 2.54mm 3 Pin Connector
- 4mm Banana Plug High Current M5
- 2.1mm DC Jack Panel Mount
- Rocker Switch
- Screw Terminal 3 Pin
- 16AWG Silicone Flexible Wire
Voltlog #80 – Tron-Club Attiny13 Advanced Kit
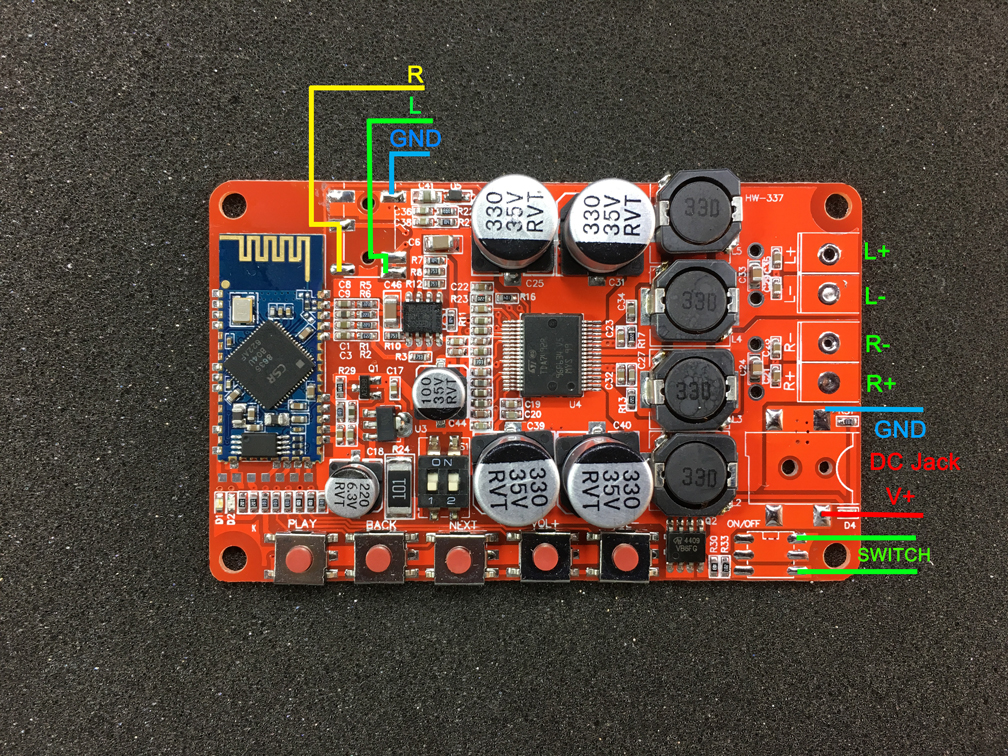
Voltlog #78 – 2x25W Bluetooth 4.1 Stereo Amplifier TDA7492P
In this episode we are going to build a bluetooth speaker amplifier based on the TDA7492P class D audio amplifier coupled with a Bluetooth 4 module. We are not actually going to build the amplifier module because we can get that from China, very affordable, it only costs around $12 shipped which is way less that it would cost us to buy the bluetooth module and the TDA7492P individually not to mention the cost of fabricating a PCB of this size.
So we are actually going to use this module and build the final product with a nice enclosure and a suitable external power supply
Here are some links for the parts used to build this project:
- Bluetooth Audio Amplifier With Enclosure TDA7492P
- Bluetooth Audio Amplifier PCB Module TDA7492P
- Switching Power Supply Brick 24V 3A
- Aluminium Enclosure 110x66x24
- DC Power Jack Panel Mount
- 3.5mm Stereo Jack Panel Mount
- 4 Way Speaker Terminal
- Mini Rocker Switch On/Off 3A
- 100x100x0.5mm Thermal Silicone Pad
- 20x20x15 Aluminium Heatsink
- Countersunk Screw 3x6mm
- Brass Standoffs Kit
- Self Adhesive Rubber Feet
Wiring diagram below:
Voltlog #72 – DIY AC-DC Off-Line Converter With TNY276/TNY277
This is the first AC-DC power supply that I’m designing and building. Everything seems to work up to a point where the chip (TNY 276 from Power Integration) gets too hot and enters thermal protection. This is where I’m asking my viewers help to jump in with suggestions on what might be wrong.
This is part 2 where I get the circuit working by switching from the TNY276 to the TNY277 which has a higher power rating and is probably the proper IC to use with this transformer (EE1616 ER2741)
And this is part 3 of the video where I finally find the real fault in the circuit. It turns out I was right, this circuit should have worked with the TNY276 as well and it wasn’t the higher power rating of the TNY277 that fixed the issue.